

Reducing Camera Shake with Tripod Feet
This is my third article in a series where I focus on how to reduce or eliminate camera shake when you're using telephoto and super telephoto lenses. In this article, I'll focus on how tripod feet can help reduce camera shake. Tripod feet might not be the first thing that comes to mind when you think about reducing camera shake, but it turns out that you really should make sure that your tripod has the right feet for the job.
Links to my first two articles on reducing camera shake are listed at the end of this article.
I've thought a lot about reducing camera shake because I've been shooting at very high focal lengths for the last eight years with Nikon super zoom cameras. I'm currently shooting with the Nikon COOLPIX P1100 camera which has a focal length range of 24mm to 3,000mm (35mm equivalent). And I spend most of my time snapping pictures and recording video at or close to 3,000mm (and higher with the P1100's in-camera digital magnification). We all know that telephoto focal lengths magnify what we're shooting, but they also magnify the effects of any camera movement.
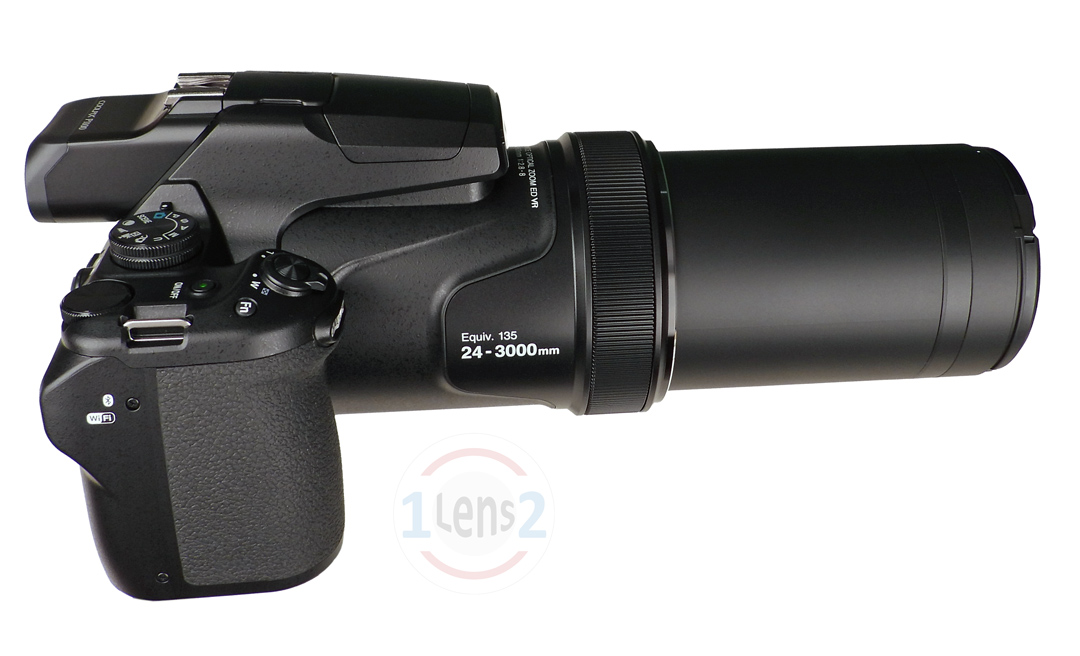 The Nikon COOLPIX P1100 super zoom camera.
HOW FEET AFFECT CAMERA SHAKE
There are multiple components to a tripod. The camera attaches to the tripod head. The tripod head is what allows the camera to pan and tilt. The tripod head attaches to the tripod legs. The tripod legs stabilize the camera and provide the ability to raise and lower the camera. Tripod feet attach to the bottom of the tripod legs. Tripod feet provide a stable contact between the tripod and the ground, the floor, or whatever surface the tripod is on.

The proper tripod feet can reduce or eliminate camera shake by gripping the surface under it. That prevents the tripod - and therefore the camera - from slipping or otherwise moving. When the camera slips even a tiny amount when using a long telephoto lens, whatever you are photographing or recording will appear to shake. Just touching the camera can cause the tripod to move if it's not properly anchored to the ground using the right tripod feet. Other external forces like the wind can also shake the camera if the tripod is not solidly connected to the ground or any other surface that it's on.
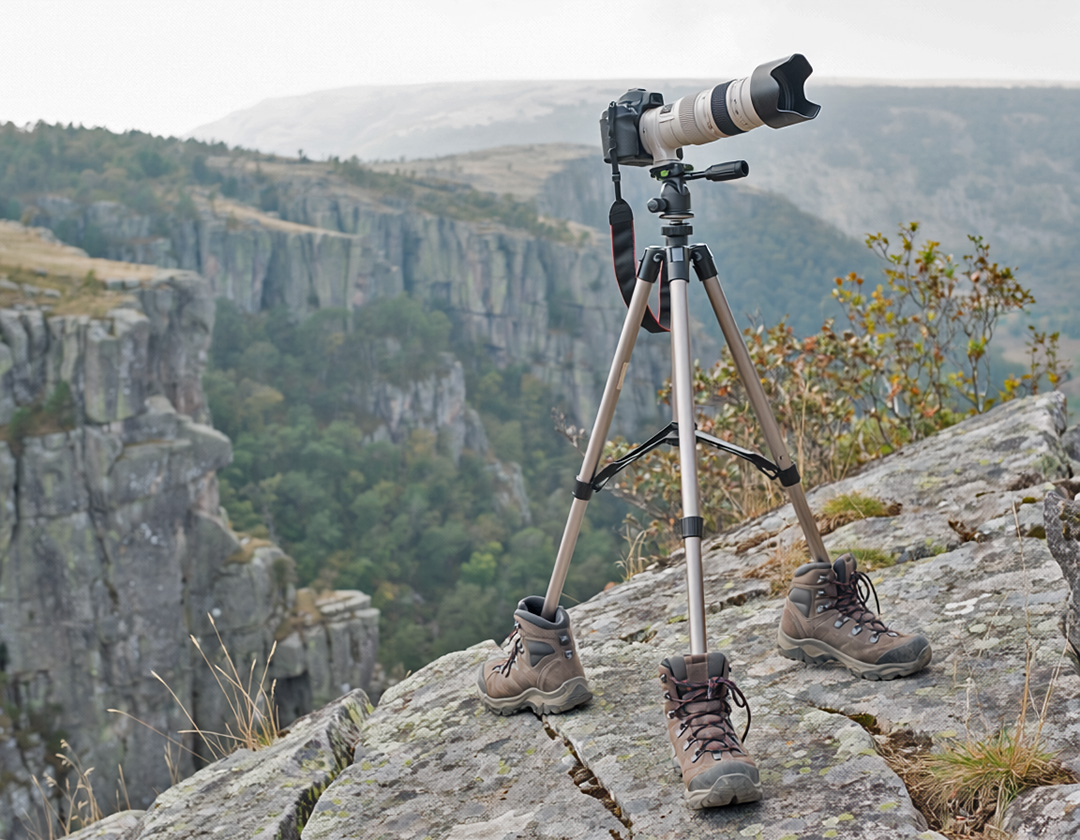 Match the tripod feet to the terrain.
Tripod feet can provide another important mitigation for camera shake. Feet made of certain materials, like rubber, can absorb vibrations coming from the ground which prevents those vibrations from traveling up the tripod to the camera. For example, a gas generator providing electrical power on a photo shoot can transmit vibrations through the ground to the tripod. People walking or kids running on a wooden viewing platform can also vibrate the tripod.

OK, let's take a reality check here. How noticeable can it really be if the tripod feet slide a little bit on the ground or allow some vibration to travel up to the camera? Are you really going to notice it when looking through the camera's viewfinder? Well, if your camera has a wide-angle lens or anything other than a telephoto lens on it then you're probably not going to notice it. But if you're using a telephoto lens - and especially a super telephoto lens - then you will almost certainly notice it.
Everyone knows that a telephoto lens magnifies the scene that you're pointing the lens at. But telephoto and super telephoto lenses also magnify the movement of the camera which makes the subject in your viewfinder look like it's shaking. In fact, at higher focal lengths, camera movement or vibrations that cannot be seen with the naked eye can make it look like you're using your camera during an earthquake!
So now that we confirmed that we hate camera shake, let's talk about how tripod feet can reduce or eliminate it!
END CAPS
Some people might not be aware that tripod legs and tripod feet are different components. That's probably because not all tripods have detachable feet on the ends of the legs. Some tripods simply have a rubber or plastic end cap that slips over the end of the bottom tube of the tripod legs.
In my opinion, end caps are not feet. It seems to me that the primary purpose of most end caps is not to provide a stable connection with the surface below them. Instead, most end caps are for cosmetic purposes or merely to prevent the raw end of the tripod tube from scratching the floor. Therefore, most end caps fall short when it comes to reducing camera shake. In fact, end caps that do not make a stabile connection with the surface under them can actually cause camera shake because without a stable connection to the floor or the ground, the tripod can slip which can shake the camera.
 An end cap on a tripod leg... Boo!
If you have a telephoto lens or a super telephoto lens, and you're serious about reducing camera shake, then my first recommendation is to avoid tripods with end caps on the bottom of the legs.
REPLACEABLE FEET
Some tripods might have proper feet on the bottom of the tripod legs, but the feet are not removable. That's better than end caps, but it's not ideal. If you're going to use your tripod on different surfaces like carpet, tile, ice, or rocky terrain, then you'll need the ability to attach the proper feet to your tripod for the surface that it will be on.
 Different surfaces require different feet.
For example, wide bottom tripod feet made of rubber are great for surfaces like tile, concrete, wood, and vinyl flooring because the increased surface area of rubber makes a solid connection to those flat, even materials. But putting a tripod with wide rubber feet on grass or carpet would float the tripod feet over the top of those surfaces, providing a spongy connection. A spongy connection is the last thing you want when you're trying to reduce camera shake.
Likewise, spiked feet will provide a solid contact with carpet, but they will slide around on flooring like tile and vinyl.

To help with reducing camera shake, I recommend a tripod that allows you to change the feet. In addition, tripod feet can break and some feet materials like rubber can wear out over time, so being able to replace feet will extend the life of your tripod.
There is no universal standard for attaching replaceable feet to tripod legs, but a common approach is to screw the foot into a threaded hole on the bottom tube of the tripod legs. Many tripods from Benro, Gitzo, Peak Design, Really Right Stuff, Induro, Robus, and others take this approach. And the de facto standard seems to be that replaceable tripod feet have a 3/8"-16 bolt that screws into the tripod legs. That means that the bolt attached to the tripod foot has an outside diameter of 3/8-inch with 16 threads per inch (thread pitch). There doesn't seem to be a clear conversion of this bolt specifications from the imperial measurement system to the metric system.
 Attaching a replaceable foot to a tripod leg.
Choosing a tripod that uses the most common approach for attaching tripod feet will give you the most flexibility for choosing different types of replacement tripod feet. And that means you'll have the best chance of putting the best type of feet on your tripod for the specific surface that the tripod will be on. We're going to talk about matching tripod feet to different surfaces in the next section. So, I recommend a tripod that uses tripod feet with a 3/8"-16 bolt.
When I first learned about attaching a foot to leg with a 3/8" bolt, I was concerned about the foot coming lose over time and falling off. In my experience, it's rare, but I have seen it happen. So now when I setup the tripod at the start of a photo shoot, I give each of the feet a turn to make sure it's tightly attached to the leg. I'm running my hand down the legs when extending them to unlock and lock the latches, so I just reach down a little farther and check the feet.
Some tripod feet are sold with a small wrench that can be used to snugly attach the feet to the legs. And some tripod feet have a rubber O-ring or a gasket around the bolt which helps to secure the foot to the legs. If your tripod feet do not have O-rings or gaskets, then you can just buy rubber O-rings from the hardware store and slide them onto the 3/8" bolts before you screw the feet onto the tripod leg.
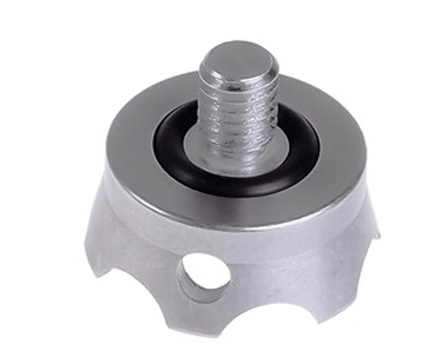 A tripod foot with an O-ring.
Interestingly, Manfrotto - one of the most well-known tripod manufacturers - does not use feet with a 3/8"-16 bolt. Manfrotto replacement feet don't have a bolt on them. Most of the Manfrotto replacement feet have a slot that slides over the end of the bottom tube on the tripod legs. Sort of like... an end cap!
 A Manfrotto replacement tripod foot.
The downside to this approach is that you have to match the diameter of the slot on the foot to the diameter of the tripod leg tube. That limits your choice of tripod feet to those that have the diameter of your tripod leg. Also, since the feet slide over the end of the tube, you need to tighten a screw to secure the foot to the leg. So you'll need to carry a screwdriver with you on location if you'll need to swap feet. My personal preference is to screw a foot into a leg with a 3/8"-16 bolt by hand.
MULTI-USE FEET
Replaceable tripod feet with a 3/8"-16 bolt allow you to quickly put on the best feet for the surface that the tripod will be on. But if you find that you're always using either basic rubber feet or spiked feet, then multi-use feet can also be a good choice. Multi-use feet have a rubber foot AND a spike foot. I've seen two types of multi-use feet. For one type, the spike is inside the rubber foot and you rotate a section of the foot to extend or retract the spike.
 A retractable multi-use tripod foot.
For the other type of multi-use tripod foot, the rubber foot is slipped over or otherwise temporarily attached to the spiked foot. While using the spiked foot, you just put the rubber portion of the foot in your gear bag. Or if you're absent minded like me, you store the rubber foot portion somewhere and then forget where you put it :)
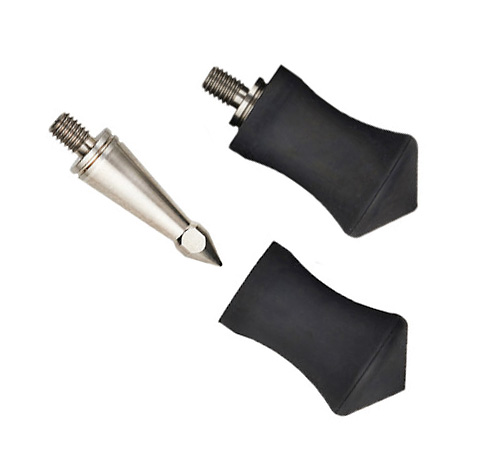 Convertible spike & rubber tripod foot.
If you don't want to be taking feet on and off of your tripod legs, then a set of multi-use feet that have the right foot types for your photo shoots can be very convenient.
For this section, I referred to the rubber feet / spike feet combination because this is by far the most common multi-use foot combination. You may be able to find other foot types in a multi-use tripod foot.
LET'S MEET THE FEET
To reduce camera shake, match the right type of tripod foot to the surface that the tripod will be on. Let's take a look at the most common types of tripod feet and when to use them.
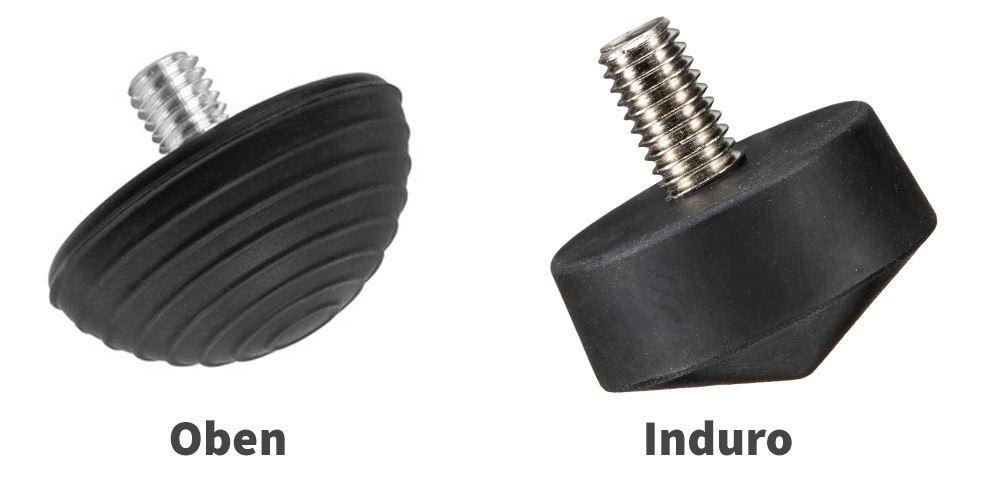
The most common tripod foot is the good old garden variety rubber foot. The rubber material "sticks" to hard surfaces like wood, tile, vinyl, concrete, rock, and pavement. The feet reduce camera shake by preventing the tripod from slipping on these types of surfaces. Plus, the rubber material can absorb vibrations from the surface before they can travel up the tripod legs and shake the camera.
Due to the number of surfaces that rubber feet work well with, I recommend that most people keep a set of basic rubber feet on hand.
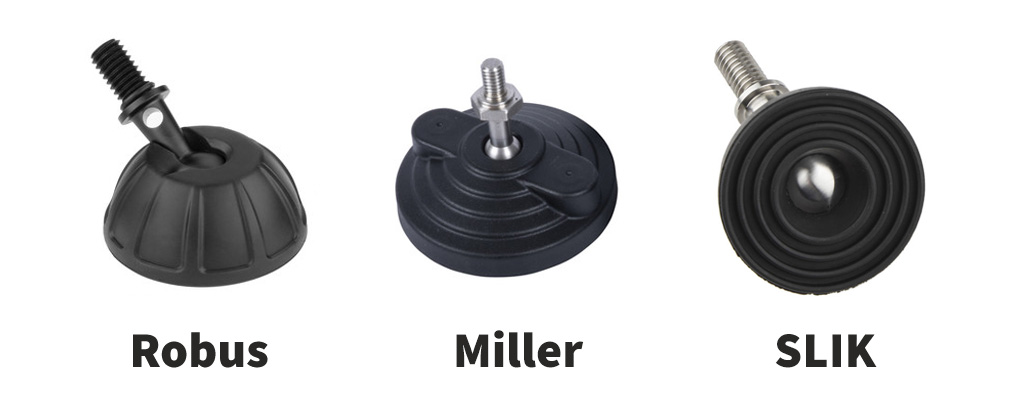
There is also a wide version of the rubber foot. The wide rubber foot provides more surface contact which makes it "stick" more to hard, smooth surfaces. Most wide rubber feet have a swivel attachment which allows the foot to stay parallel to the surface under it regardless of the angle of the tripod legs.
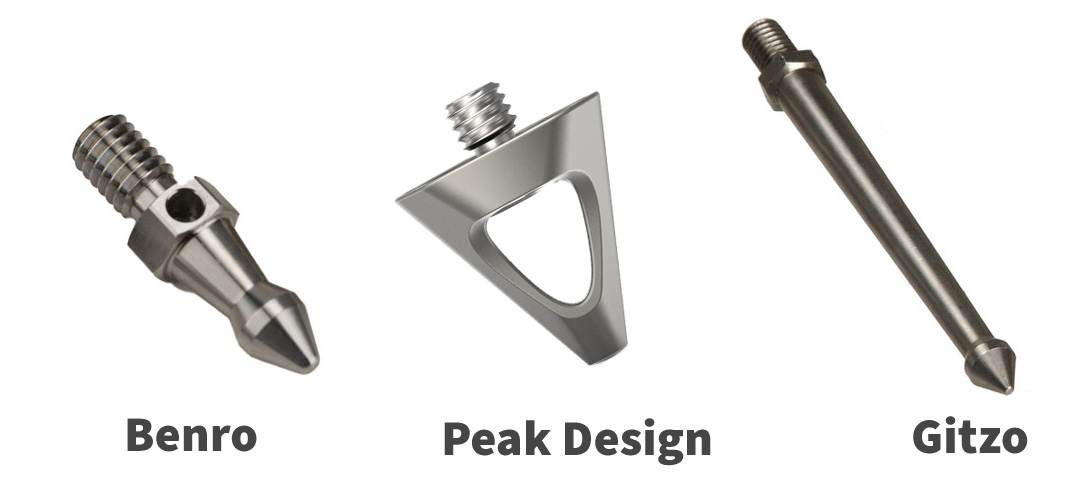
The second most common type of tripod feet after the basic rubber feet is the spiked foot. Spiked feet can "dig in" to soft and loose surfaces which can solidly anchor the tripod to that surface. Spiked feet are good for surfaces like dirt, thick mud, sand, gravel, ice, grass, carpet, and any type of surface that is unstable. Due to the number of surfaces that spiked feet work well with, I recommend that most people keep a set of spiked feet on hand.
If you are going to place your tripod on ice then I recommend that you select a spiked foot with a particularly sharp spike. Ice is so dense and slippery that you'll need to basically cut into it to prevent the tripod from sliding. Check-out how sharp the Leofoto spiked tripod foot is in the picture below.

Spiked feet are good for thick mud that will hold the spike when it digs into it, but for really wet mud, you might want to consider a "spike and basket" foot (see below).
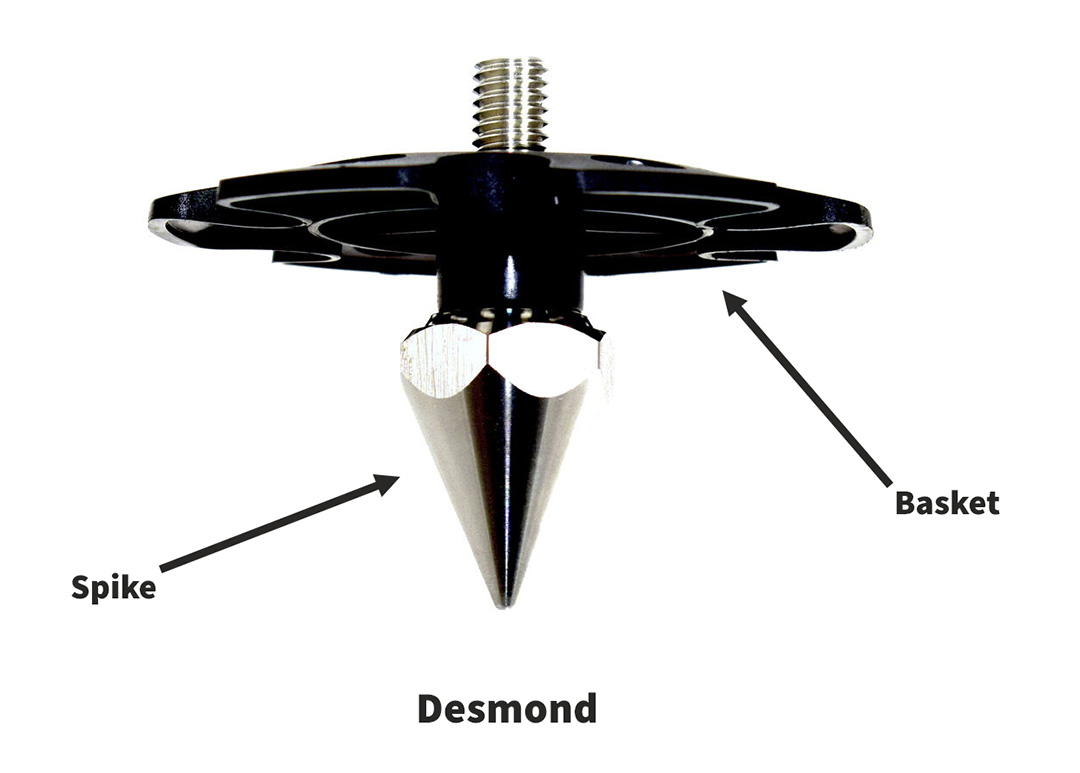
The spike and basket combination tripod foot provides double action stabilization for loose or mushy surfaces like wet mud, snow and beach sand. The spike digs into these types of surfaces, anchoring into the ground. The basket prevents the spike from being pressed deeper into the ground any time force is applied to the tripod (like wind or pressing the shutter button on the camera).
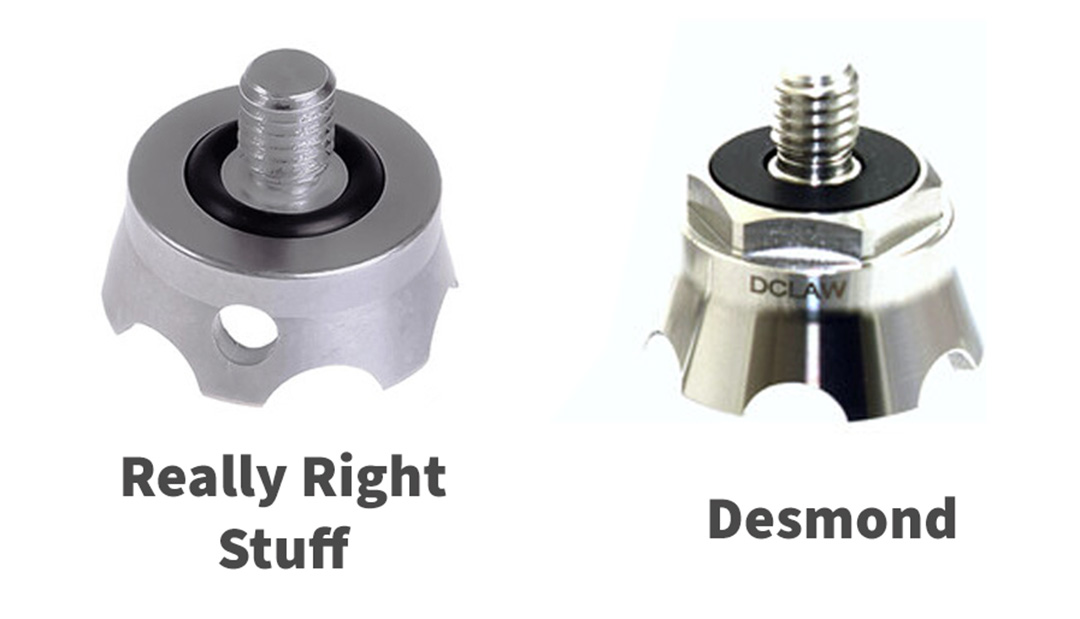
Wait, there are tripod feet made for rocks? Yes! Also called a claw, the sharp metal edges of this tripod foot are designed to dig into uneven rocky terrain. Looking at those sharp scalloped edges, I suppose it can bite into other uneven surfaces too. But, keep in mind that that these feet are sharp, so they can scratch some surfaces, so you probably don't want to use them indoors!

And finally, if you absolutely, positively need to ensure that your tripod does not move a micron, then you can put feet on your tripod that have a hole in them and then drive a screw through the hole and into a solid surface. If your tripod is on a soft surface then drive a long stake through the holes and into the ground. Because anything worth doing is worth over doing!
Want more nuclear options? You could super glue the tripod feet down. Or heck, dig three holes, fill them with concrete, set the tripod legs in the concrete, and let the concrete harden :) By the way, I'm kidding!
WRAP-UP
Before we wrap-up our discussion of tripod feet, here are a few general tips:
- For tripod feet that dig into the surface beneath it (like dirt, ice, etc.), consider hanging a weight from the tripod. I discuss using weights with tripods in this article.
- The metal components of tripod feet should be stainless steel to reduce the formation of rust. This is most beneficial when you're using your tripod outdoors.
- If you are making the effort to put the right feet on your tripod to reduce camera shake, then be sure that you too are wearing the right shoes for the terrain that you'll be on. Even the perfect tripod feet probably won't stop the tripod from moving if you slip and bump into it!
- Give your tripod feet the best chance to connect to the ground by spreading the tripod's legs as wide as is appropriate. Tripods are more stable with a wide stance.
- Are you going to put a new type of feet on your tripod? Great! But be sure to get a feel of how to use them on the intended surface before an important photo shoot.
And you can find many more tips for reducing or eliminating camera shake in the other articles in my camera shake reduction series.
- Episode #1: About Camera Shake
- Episode #2: Tripod Legs
-
Episode #3: (This episode)

Other Articles You Might Like
- Reducing Camera Shake - Tripod Legs
- An Introduction to Camera Shake
- The P1100 Super Zoom Variety Series Begins!
- Goodyear Blimp with the Nikon P1000
- Zooming in on Manhattan with the Nikon P900 Camera
- Nikon COOLPIX P1000 and the Xcelerator Roller Coaster Tower
- Zooming in on the Stratosphere Tower
- 50X Zooming for Photos with the FinePix S9400W
- FinePix S9400W Basic 50X Video Zooming
 John Miller
is the owner of "One Lens Two" and "In and Around Phoenix". He is also a co-owner of "Fooding Around Phoenix". John is always looking for collaboration opportunities so contact him using one of the options below!
John Miller
is the owner of "One Lens Two" and "In and Around Phoenix". He is also a co-owner of "Fooding Around Phoenix". John is always looking for collaboration opportunities so contact him using one of the options below! 